The Process of Upgrading an Electric Panel: What to Expect

Introduction:
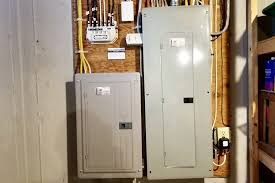
If you are considering upgrading your electric panel, it is important to understand the process and what you can expect. An electric panel, also known as a breaker box or fuse box, is the central distribution point for all of the electricity in your home. It controls the flow of electricity to your outlets, lights, and appliances, and it helps to protect your home from electrical fires and other hazards. An electric panel upgrade can help to improve the safety of your home by ensuring that your electrical system is up to date and capable of handling your electrical needs. Here is a step-by-step guide to the process of upgrading an electric panel.
- Schedule an Inspection:
The first step in the process of upgrading an electric panel is to schedule an inspection with a licensed electrical contractor (also known as a master electrician). During the inspection, the electrician will assess the age and condition of your electric panel and determine if an upgrade is necessary. They will also evaluate the electrical needs of your home and determine the size and type of panel that will be required.
- Obtain Permits:
Once you have decided to proceed with an electric panel upgrade, the next step is to obtain the necessary permits. This will typically involve submitting a permit application to your local building department and paying any required fees. The master electrician will handle this process for you, so you don't have to worry about it.
- Disconnect the Power:
Before the electric panel upgrade can begin, the power to your home will need to be disconnected. This will typically be done by the master electrician, who will use a main switch to shut off the electricity to your home. This is an important safety precaution, as it ensures that no one is injured during the upgrade process.
- Remove the Old Panel:
Once the power has been disconnected, the master electrician will begin the process of removing the old panel. This will typically involve removing the cover and any mounting screws, and then carefully disconnecting the wires. The electrician will take care to label each wire so that they can be properly reconnected to the new panel.
- Install the New Panel:
Next, the master electrician will install the new electric panel. This will involve mounting the panel in the same location as the old panel and connecting the wires according to the labels. The electrician will also install any necessary circuit breakers and make sure that the panel is properly grounded.
- Test the System:
Once the new panel has been installed, the master electrician will test the system to ensure that it is functioning properly. This will involve turning the power back on and testing each circuit to make sure that it is working correctly.
- Clean Up:
Finally, the licensed electrical contractor will clean up any debris or mess that may have been created during the upgrade process. This will typically involve disposing of the old panel and any other materials that are no longer needed.
Conclusion:
In conclusion, upgrading an electric panel is a complex process that requires the expertise of a licensed electrical contractor. By understanding the steps involved, you can be better prepared for what to expect during the upgrade process. An electric panel upgrade can provide a number of safety benefits for your home, including reduced risk of electrical fires, increased electrical capacity, improved circuit protection, enhanced energy efficiency, and enhanced home value. If you are considering an electric panel upgrade, it is important to work with a qualified licensed electrical contractor who can ensure that the job is done safely and correctly.

